Click on images to see them in full screen
0A56CBD264A0B27F80258943003F8467Microsoft Graph
From Door Tablet V8.5 the primary method for accessing the Microsoft 365 Tenant is by using Door Tablet for Microsoft Graph. To read about the platform please follow this link:
https://developer.microsoft.com/en-us/graph
Delegated Permissions vs Application Permissions
From version V10.8 we support two types of Permissions for Azure Applications. This document covers both methods for authorising access to your Microsoft 365 Instance. See more below.
Note: through this document you will see Application Permissions variations marked with AP:
Please note that Door Tablet requires different information for these two types of permissions. AP: An application based on Application Permissions does not require that you modify the access rights to the room Calendar folder.
 Limiting scope of API Permissions
When using an App that uses Application Permissions, you can restrict the mail boxes the App can see. You do so by creating an application policy using PowerShell cmdlet New-ApplicationAccessPolicy. For full details please see the following Microsoft help document: https://learn.microsoft.com/en-us/graph/auth-limit-mailbox-access
TLS and Java Security
If you encounter connectivity issues please ensure that both TLS1.2 and Java Scurity policy are set on the server. See here 
Enabling Door Tablet to Access your Microsoft 365 Tenant
Download and install Door Tablet 8.5 or later. Before you start on Door Tablet set-up, you need to register the Door Tablet application here: https://portal.azure.com/#home. You will be required to sign in, use your Microsoft 365 account.
VIDEO: Door Tablet and Microsoft 365
VIDEO: Door Tablet and Microsoft 365 GCC High
You will be greeted with the following dashboard:
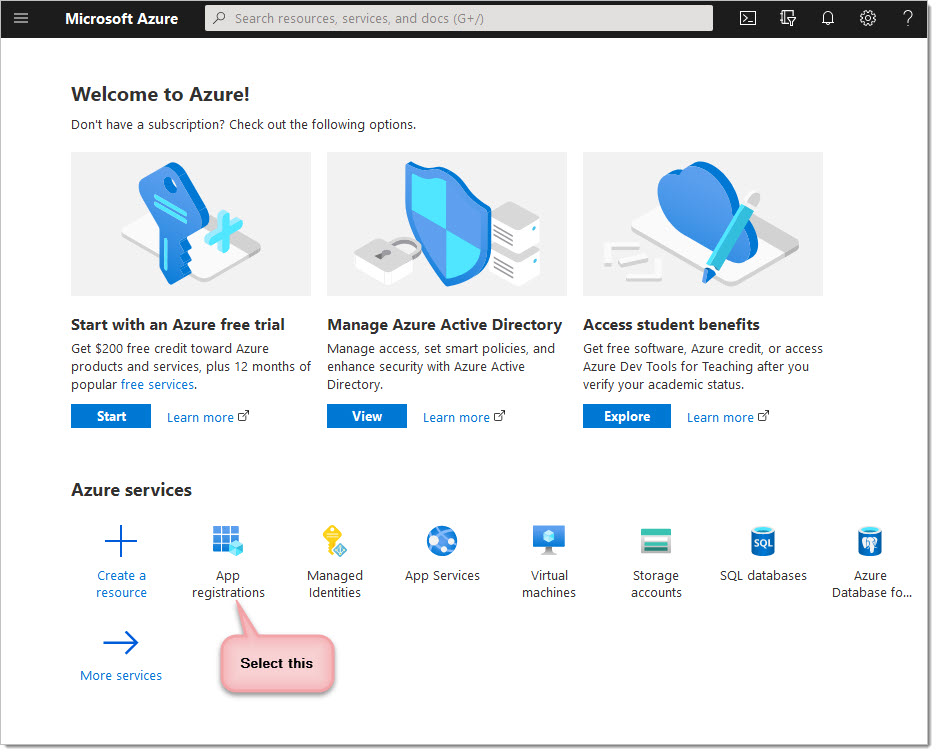
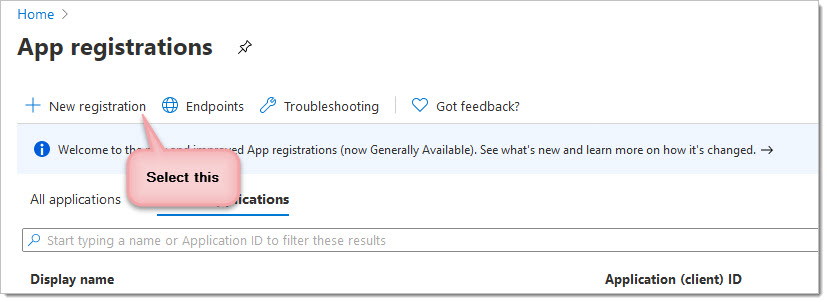
On the Microsoft Azure dashboard, click on the "Azure Active Directory", from here choose the "App registrations" option and click on "New registration".
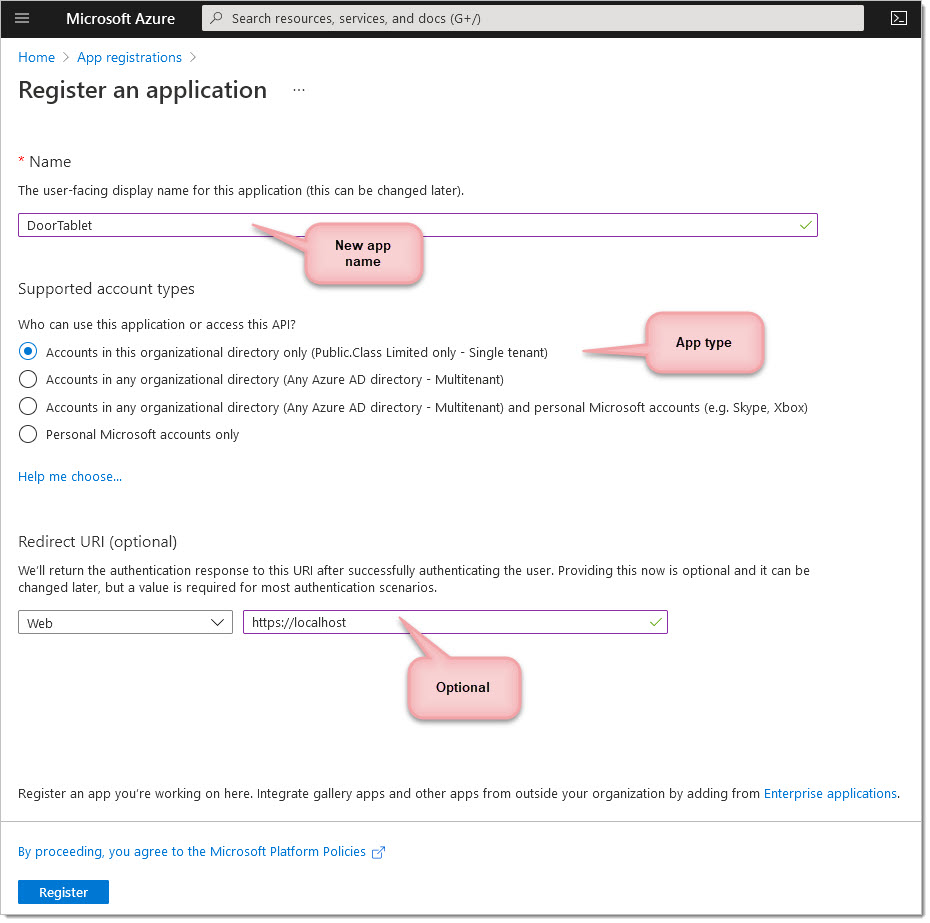
You can now name your application and choose the supported account types. You do not have to call it "Door Tablet" but we suggest you do.
After this, you should see an application (client) id on the dashboard.
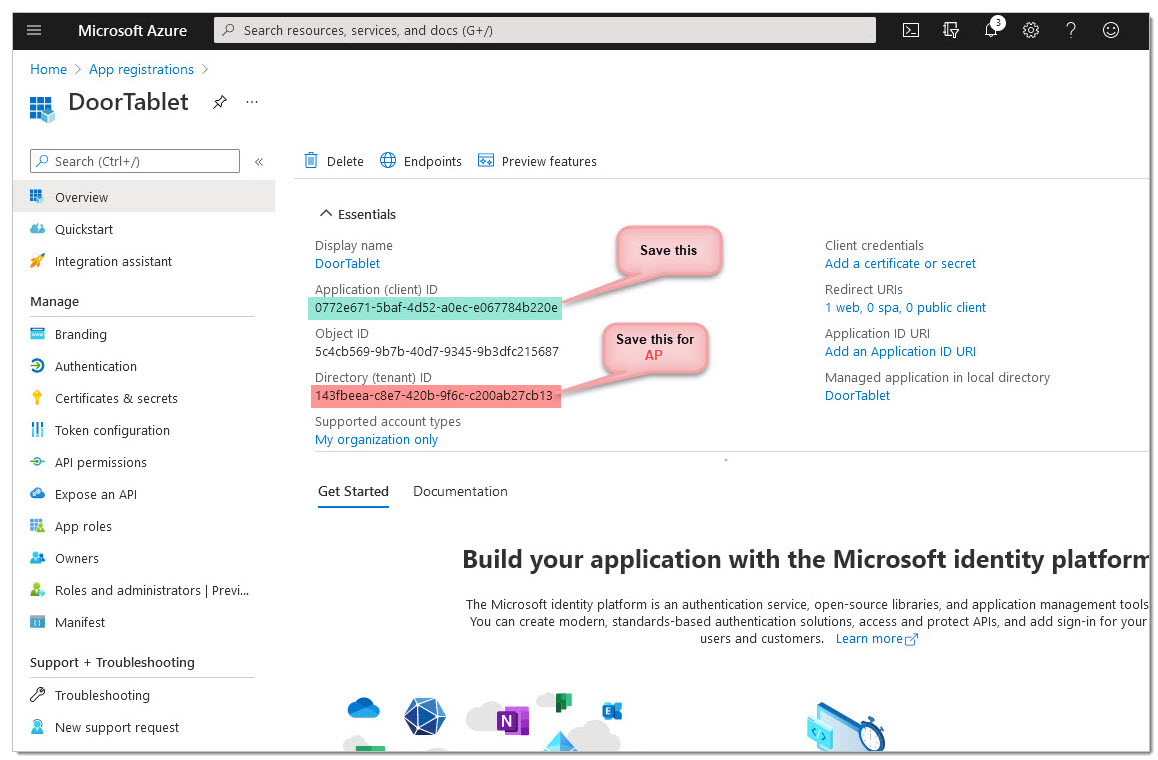
Your application is now created.
AP: You will need collect the Directory ID, or Tenant ID, too.
Next, handle Authentication.
AP: Skip this step.
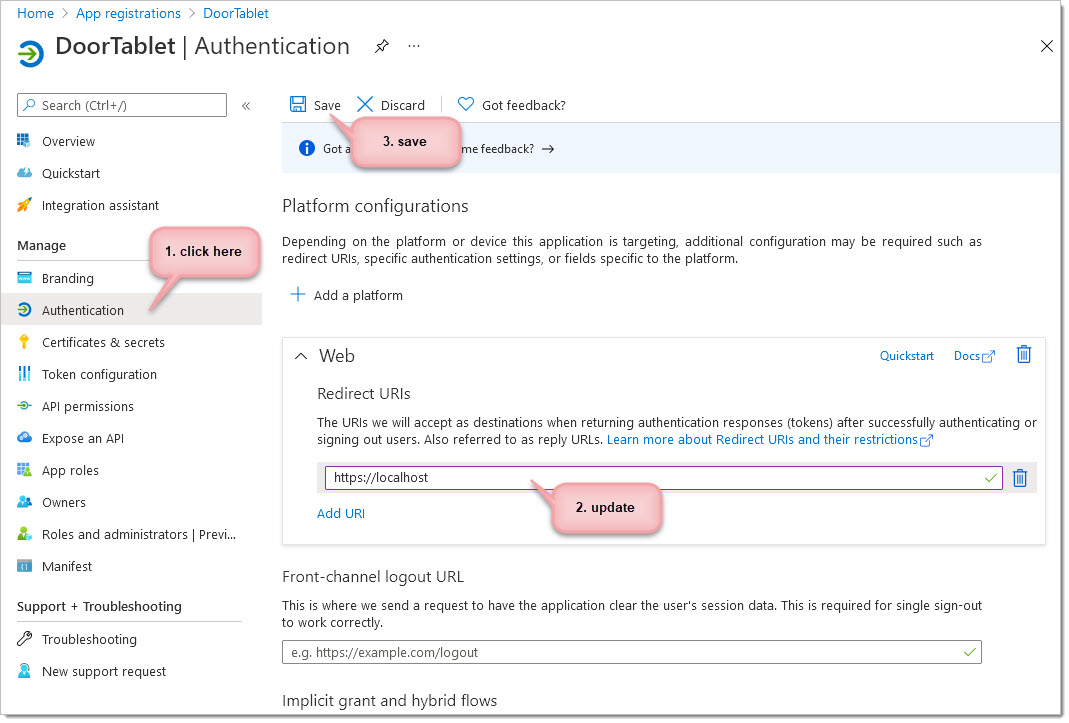
Type https://localhost. This URL will fail later, which is OK.
 Note: if you use MFA or an ID management system such as Okta, OneID and the like, you need to bypass this for the Door Tablet service account. The communication between Door Tablet and MS 365 is a Server to Server communication that begins with authentication. That authentication must be performed hands-free and direct from our server to the target MS 365 server. All ID management solutions should allow you to bypass them for certain users. AP: This does not apply to Application permission applications since a user is not involved in the process.
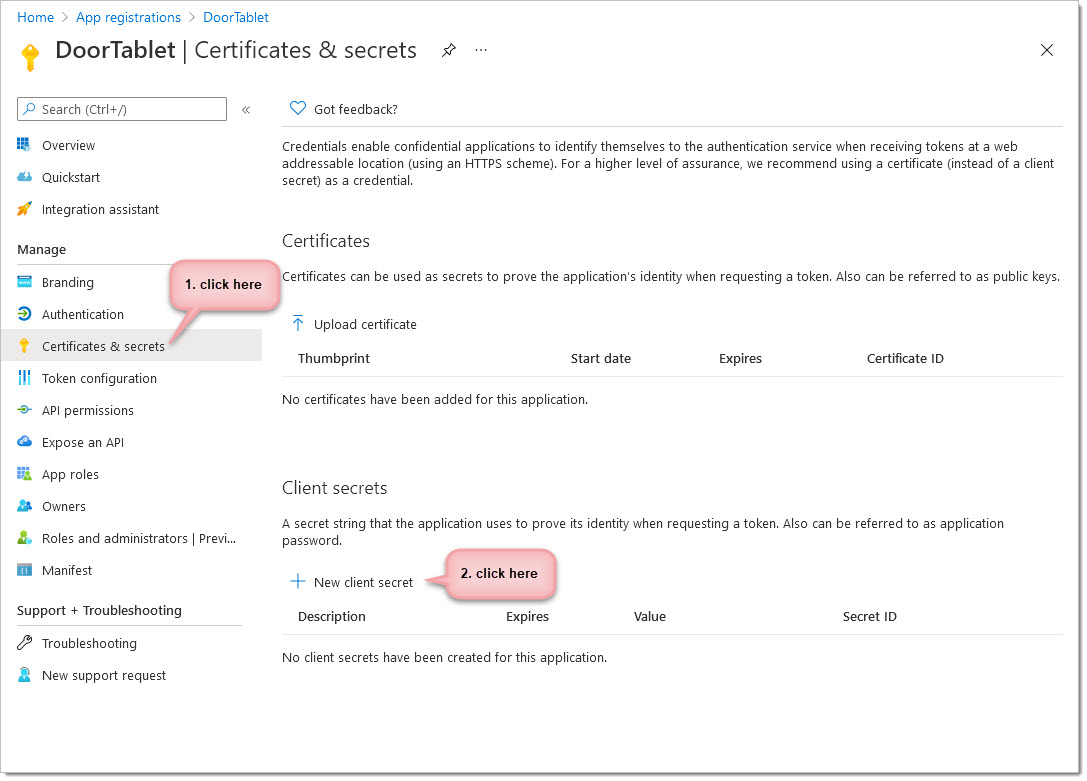
Next: Client secrets
We will need to set up a client secret in order to generate a new password. See below:
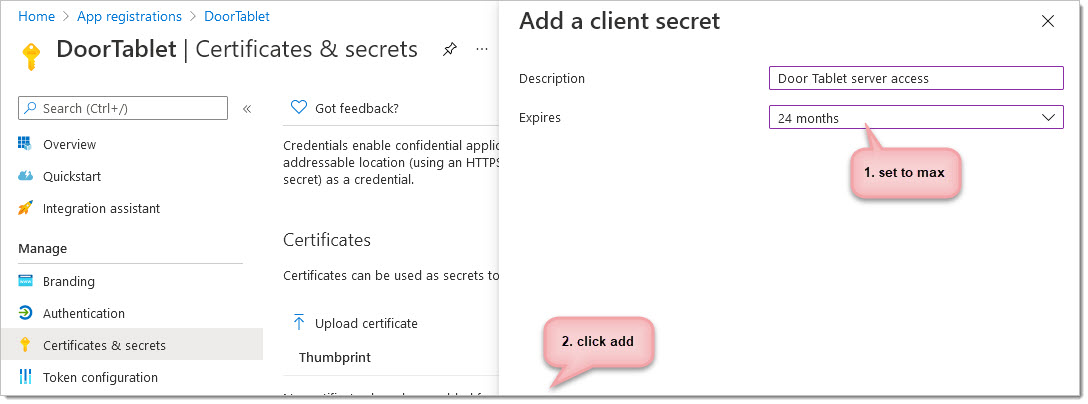
From here you can add a new client secret and set the expiration date (if you wish). Make a note of the expiration and set yourself a reminder to extend it. Then scroll to the bottom of the display and click add.
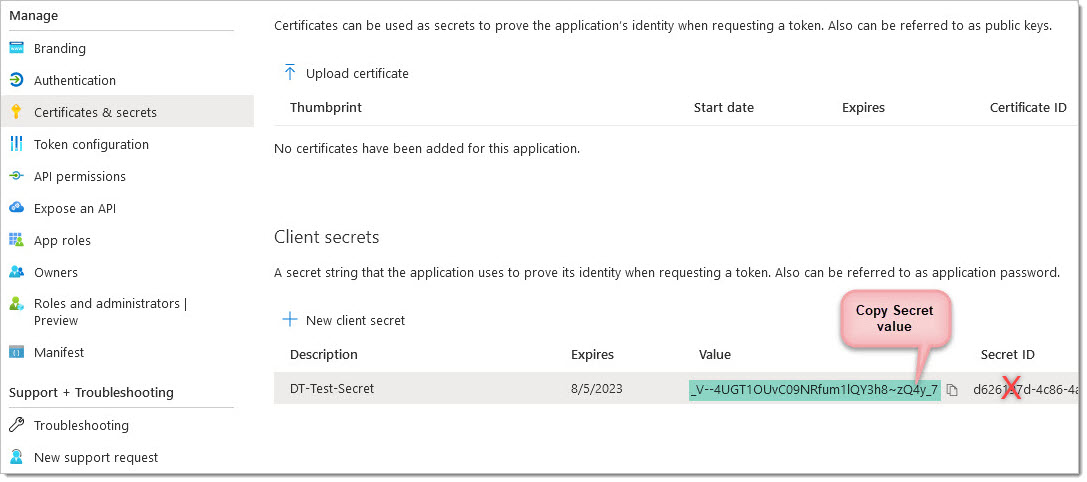
Now copy your newly created Secret Value. This will be needed in the Door Tablet system profile. Do NOT use the Secret ID
The final step here is to add permissions to the Application under Delegated Permissions. When using delegated permissions the username/password will be used for authentication.
AP: As an alternative, use Application Permissions - the application will be granted Admin consent from the tenant administrator.
To do this, click on the "API permissions" option found on the dashboard:
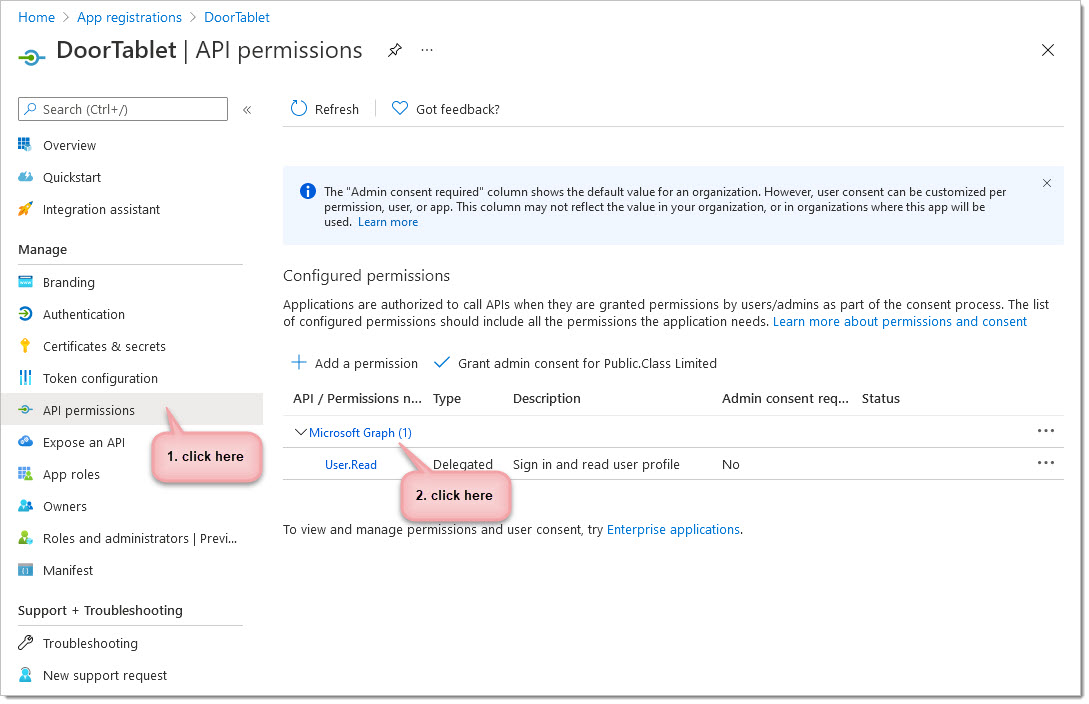
Scopes
From here, you will need the scopes showing here:
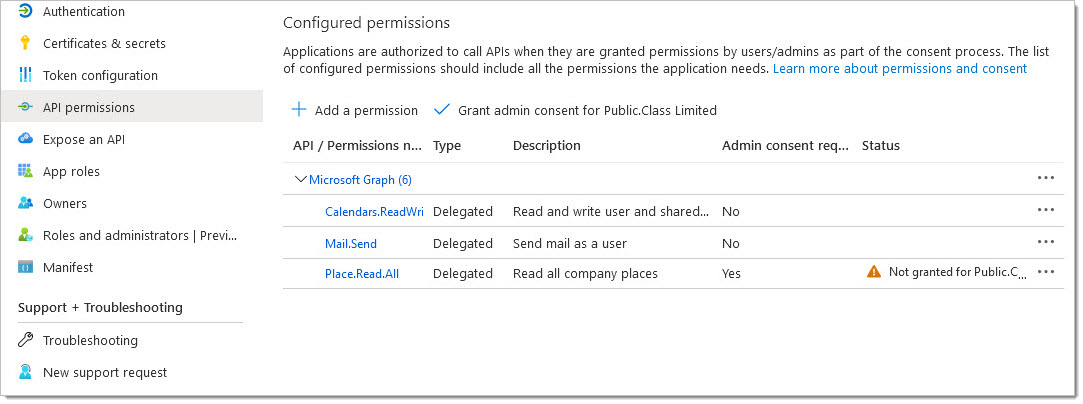
- Calendars.ReadWrite.Shared
- Mail.Send
- Place.Read.All (Microsoft 365 GCC High does not allow the use of this scope)

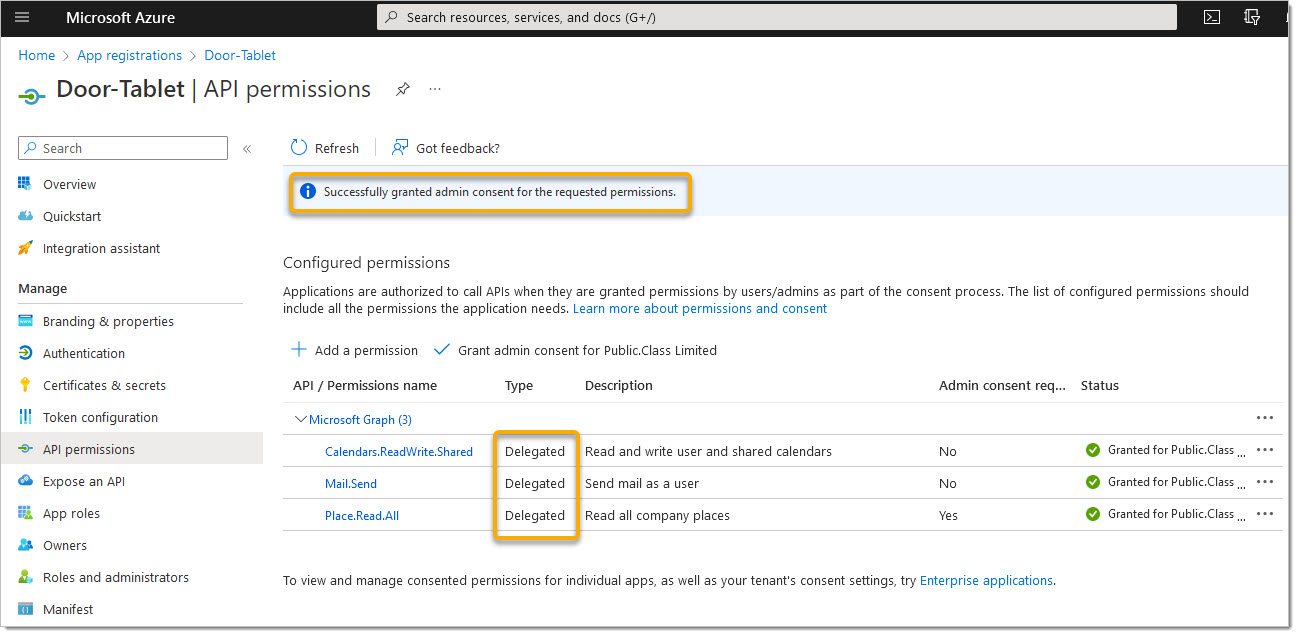
After adding the roles, your list should show these scopes:
 AP:
AP: When creating an application that uses Application Permissions add the following scopes:
- Calendars.ReadWrite
- Mail.Send
- Place.Read.All (Microsoft 365 GCC High does not allow the use of this scope)
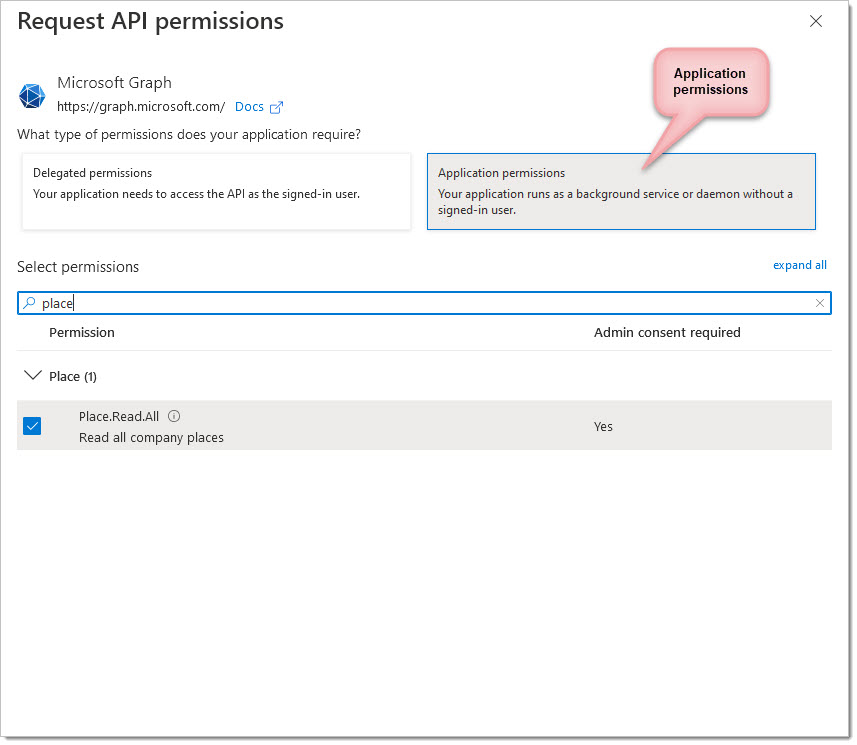
For
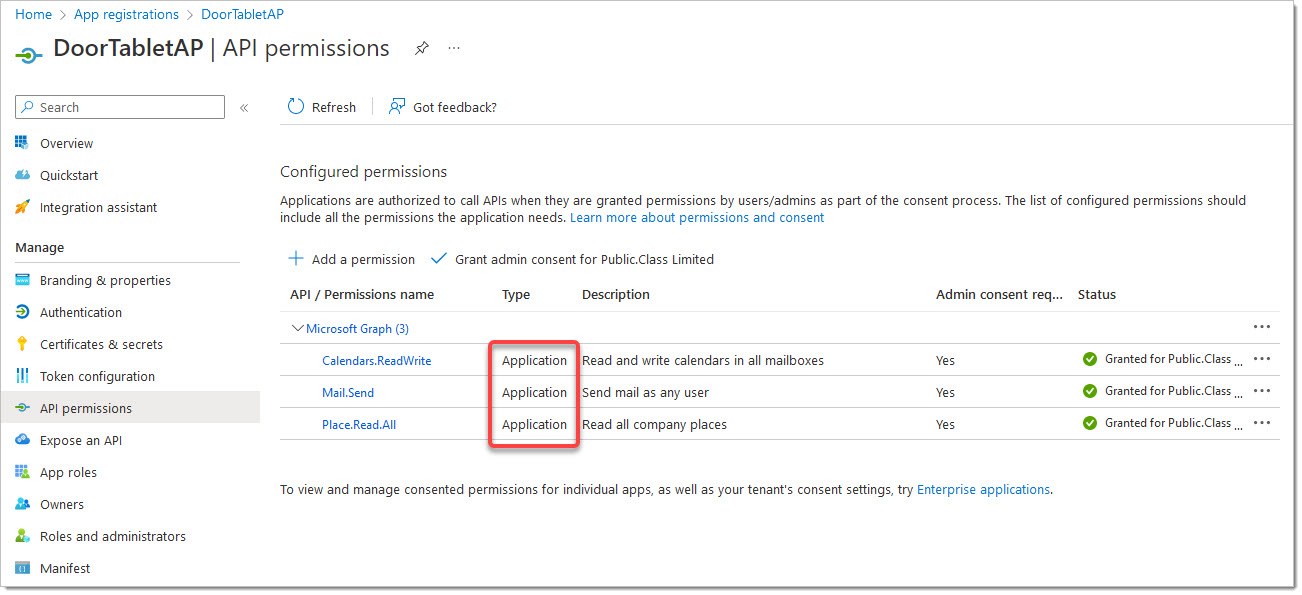
Application Permissions you will need to add scopes in a similar manner but always select Application permissions, as follows:
You will now need to
Grant admin consent for you organisation
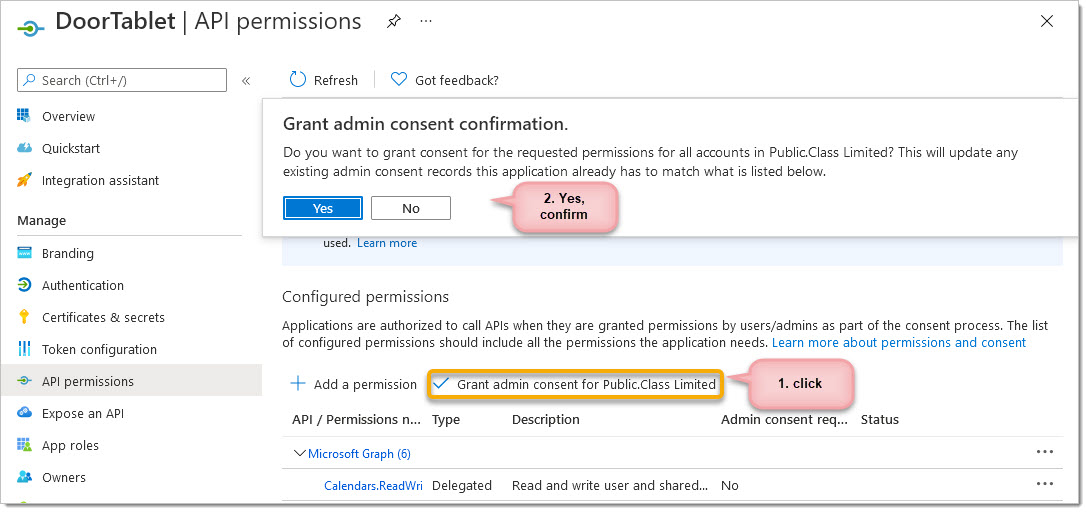
After confirmation...
 AP:
AP: Note: we recommend that you use Application permission style application, as showing below.
For Application Permissions the result is very similar:
The following command requires that you use PowerShell. See here:
Enabling Access to your Resource's Calendars
As mentioned before, Impersonation is not support in Graph. For this purpose you will need to grant the Service Account you use in Door Tablet "Editor" rights to the Calendar folder of your resources. To do this you will need to connect to Microsoft 365 as already described here . The command you need to issue for each resource is:
Add-MailboxFolderPermission <room-alias>:\Calendar -User <service-account-name> -AccessRights Editor
For example:
Add-MailboxFolderPermission Amsterdam:\Calendar -User doortablet -AccessRights Editor
Connecting the Door Tablet Server to 365
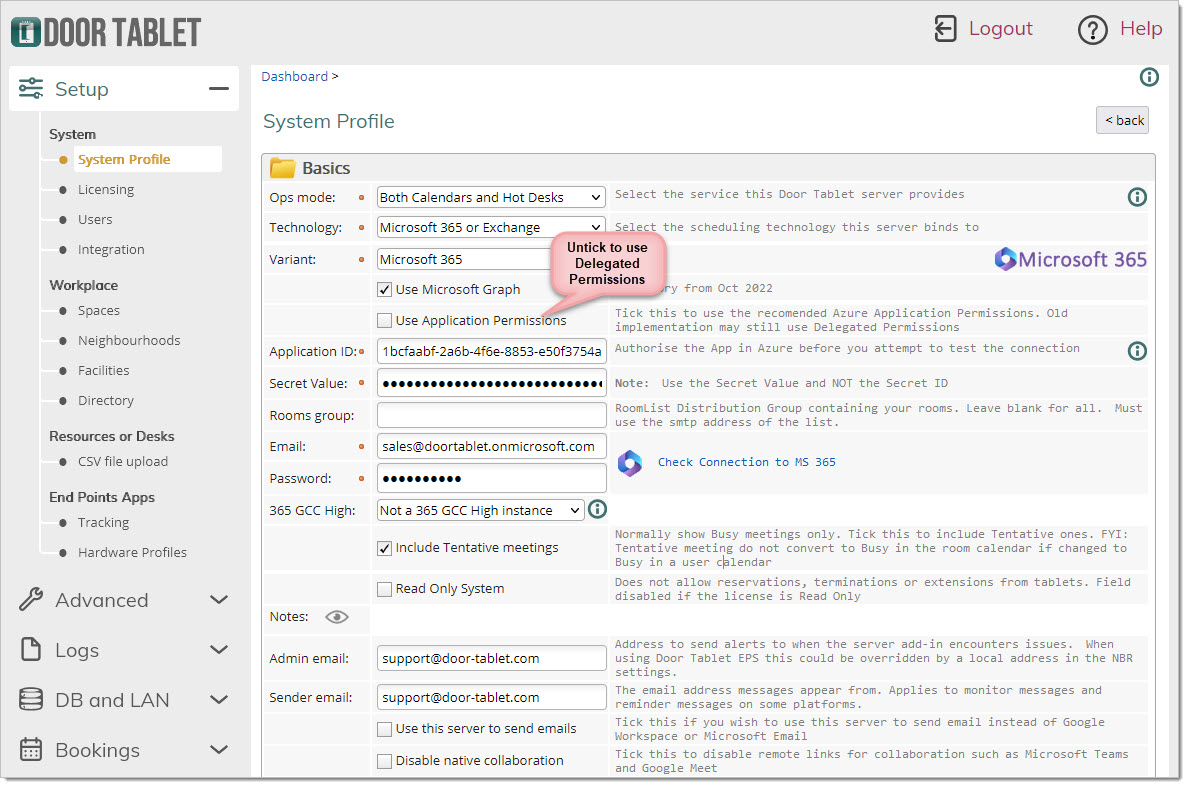
Using Delegation permissions
- Copy and paste the Application ID from the Application you defined above
- Copy and paste the Secret Value (not Secret ID)
- Type the user name and password of the service account, or the user who owns the application
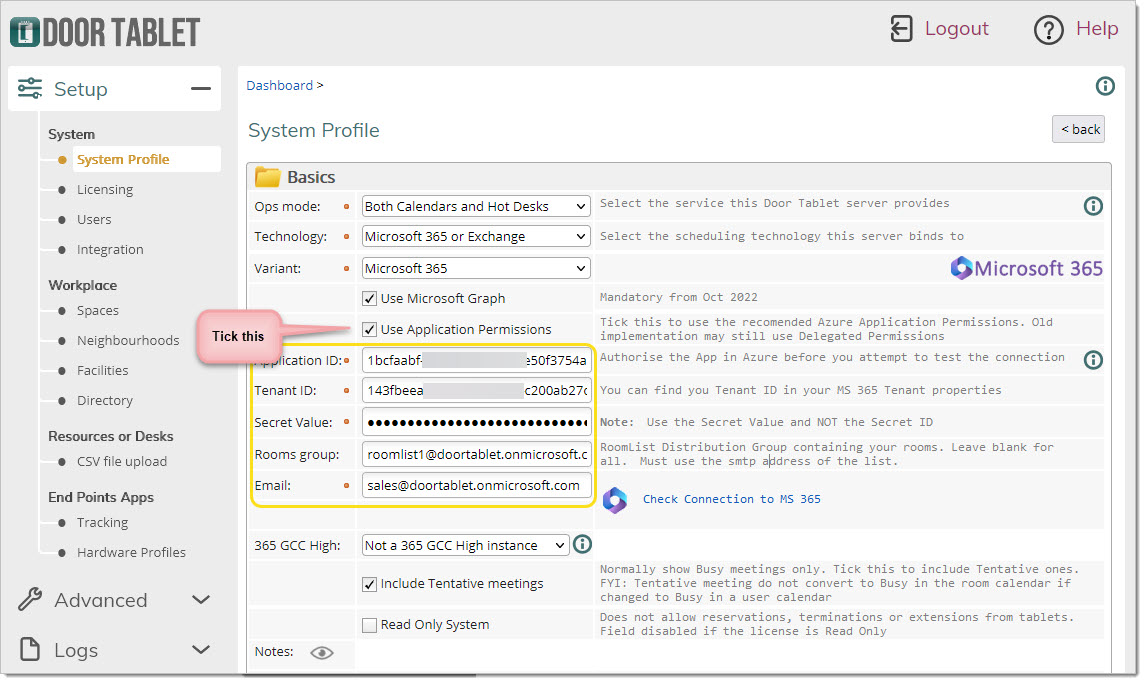
 Using Application permissions
- Copy and paste the Tenant ID of your 365 instance
- Copy and paste the Application ID from the Application you defined above
- Copy and paste the Secret Value (not Secret ID)
- Type the email of the user ID you will be using for emails
 Test your connection to Microsoft 365 using Graph
You are now ready to test your connection to Microsoft 365 using Graph Technology.
Microsoft Graph Explorer
Another way you can check your connection is by going onto the Microsoft graph explorer developer site, which can be found here:
https://developer.microsoft.com/en-us/graph/graph-explorer
Note: Explorer uses delegated permissions.
You will need to sign in by using your Microsoft account. From here you can insert the following URL and press run query:
https://graph.microsoft.com/v1.0/places/microsoft.graph.room?$top=2500
From here you should see the rooms you've created appear in the response preview below:
Please note that the following permission is granted...
If your results come back blank, you might have not consented to some of the permissions needed. To check this on Graph explorer click on the modify permissions option and check that the following has been ticked:

Once this is done click on the modify permissions button on the bottom right side of the menu. This will save the new permissions, run the query again and you should receive a successful response.