n
anonymousdoortablet/dthelp.nsfremote-led
Protected content
| 273pages | Our help system contains many pages and videos for you to consume. This includes the complete information on how Door Tablet works, all its features and options, and of course the many benefits for your business. Door Tablet School offers many videos too. |
|
 |
| 
Click on images to see them in full screen
1A863E5866AA484A80258DC9003F637DRemote LEDs Software
With a Door Tablet Device Hub installed, you can also control Remote LED lights and affect the colours based on room status. The LED light electronics connect to the Device Hub which we connect over the network.
To learn about the hardware used for Remote LEDs see here 
Learn more about the device hub here .
VIDEO: Configuring Door Tablet's External LED System
Test your LED Strip
To test a LED Strip or LED Wall you need to have Daemon and Viewer installed. The Daemon acts as a proxy between the USB or LAN interface of the Bricks and the API bindings. The Viewer connects to Daemon. It helps to figure out basic information about the connected Bricks and Bricklets and allows you to test them.
Connect the LED Strip to the Device Hub using the cable we provide. Then connect a LED strip or bunch of pixels to the Bricklet as described below.
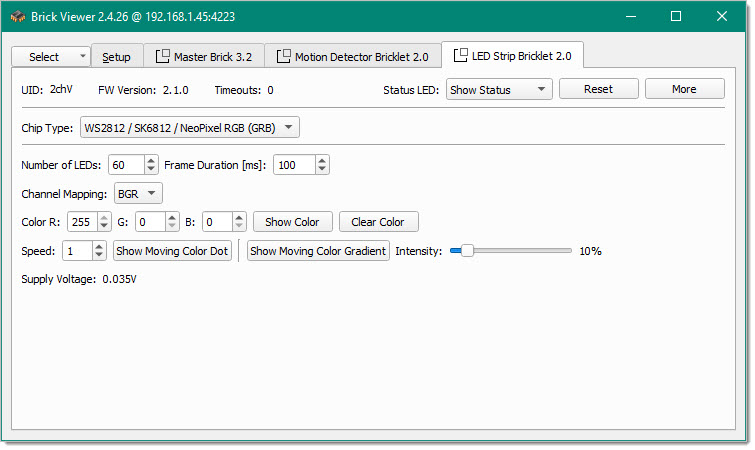
If you connect the Brick to the PC over USB, you should see a new tab named "LED Strip Bricklet 2.0" in the Brick Viewer after a moment. Select this tab. If everything went as expected you can now control a LED strip.
After this test you can go on with testing Door Tablet.
Controlling Remote LED colours
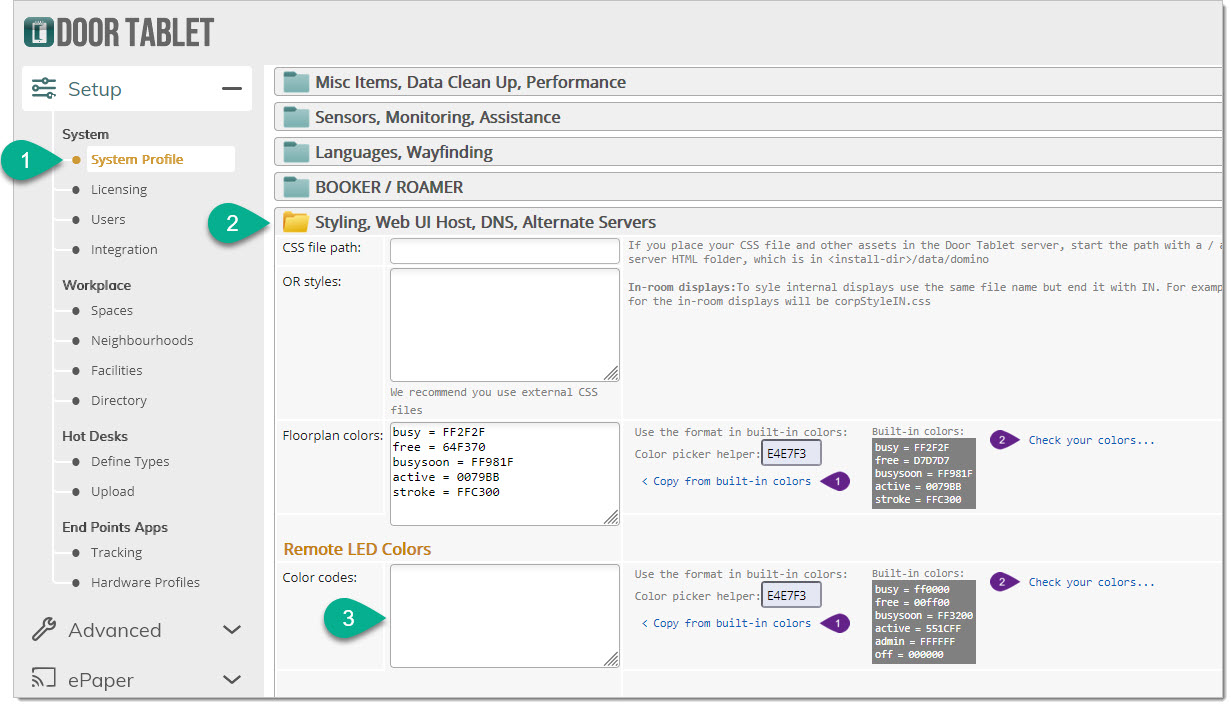
Be default the Remote LEDs will use standard colours that match the status of the room according to bookings. From version 10.50.19, you can control what colours are shown, instead of the standard colours. The mechanism uses Web Colours and these codes are used to send RGB values to the LED walls or strips. Before you change colours we recommend that you use the "Brick Viewer" to test colours using your LEDs. You can then take the values of RGB, convert them to HEX values, as used by Web Colours and submit these to Door Tablet.
Access the colour control...
Process
- Start in step one by copying the original colours
- In the codes field, keep only those you want to change
- Make changes to the HEX codes only
- Submit the System Profile
Modify only the values you need, and you can also test your selection (2).
 Note: if you want the colour of, say "busysoon" to work like free or busy, just copy those codes.
Matching colours to the LEDs results
The most effective way to get the exact colours is using the Brick Viewer.
Note: if you want the colour of, say "busysoon" to work like free or busy, just copy those codes.
Matching colours to the LEDs results
The most effective way to get the exact colours is using the Brick Viewer.
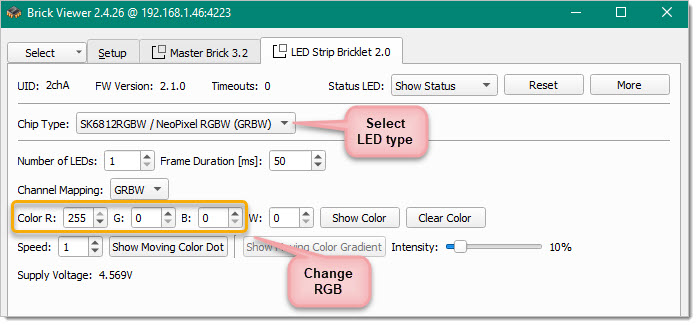 Once you are happy with a colour, collect the RGB values and convert them to HEX. For example, our choice for "busysoon" is 255, 50, 0, which when translated to HEX is FF3200. You can use AI tools to easily do this for you. Once you have the HEX code, update the Colour codes values in the System Profile.
LED Pixels
The connection of LED pixels to the LED Strip Bricklet 2.0 is similar to the connection of LED strips. There is no general colour code for LED pixels. In the following example the red wire is 5V, blue is ground, clock (WS2801 only) is green and data is the white wire.
Connect clock (WS2801 only) and data of the first bunch of pixels to the LED Strip Bricklet 2.0 and connect ground to it. Pay attention to connect the clock (WS2801 only) and data input of the first pixel to the clock (WS2801 only) and data output of the LED Strip Bricklet 2.0. If you want to measure the voltage of your power supply connect 5V to the Bricklet, too. You can connect more bunches of LED pixels to the first bunch in series.
Typically each bunch has power supply wires at the beginning and the end of the bunch. Connect these over additional wires to the power supply. You can unite nearby wires. This will reduce the resistance and minimise the conduction losses.
Configuring Door Tablet
After you have configured the device you wish to use and assigned a fixed IP to the device hub, you can now continue and configure the room to use the hardware. You will need:
Once you are happy with a colour, collect the RGB values and convert them to HEX. For example, our choice for "busysoon" is 255, 50, 0, which when translated to HEX is FF3200. You can use AI tools to easily do this for you. Once you have the HEX code, update the Colour codes values in the System Profile.
LED Pixels
The connection of LED pixels to the LED Strip Bricklet 2.0 is similar to the connection of LED strips. There is no general colour code for LED pixels. In the following example the red wire is 5V, blue is ground, clock (WS2801 only) is green and data is the white wire.
Connect clock (WS2801 only) and data of the first bunch of pixels to the LED Strip Bricklet 2.0 and connect ground to it. Pay attention to connect the clock (WS2801 only) and data input of the first pixel to the clock (WS2801 only) and data output of the LED Strip Bricklet 2.0. If you want to measure the voltage of your power supply connect 5V to the Bricklet, too. You can connect more bunches of LED pixels to the first bunch in series.
Typically each bunch has power supply wires at the beginning and the end of the bunch. Connect these over additional wires to the power supply. You can unite nearby wires. This will reduce the resistance and minimise the conduction losses.
Configuring Door Tablet
After you have configured the device you wish to use and assigned a fixed IP to the device hub, you can now continue and configure the room to use the hardware. You will need:
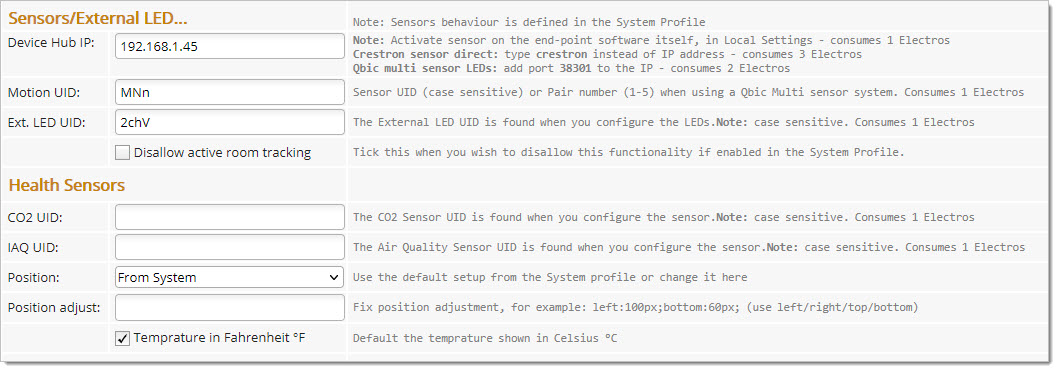
- The IP address of the device hub
- The UID of each attached device
 Once you added the above to your room, you will need to continue the setup on the actual tablet. You can also test your work on the tablet.
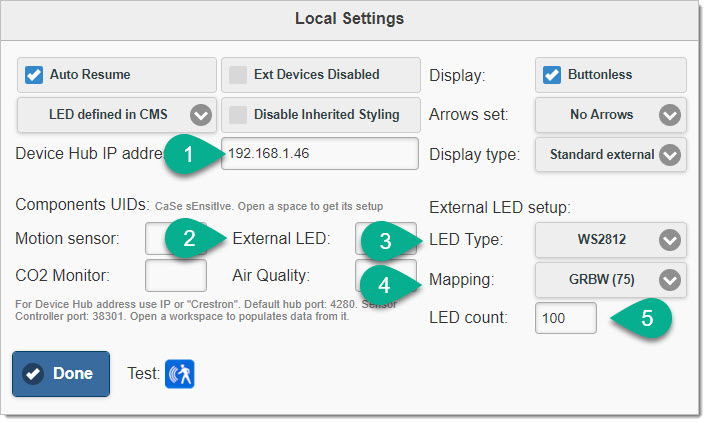
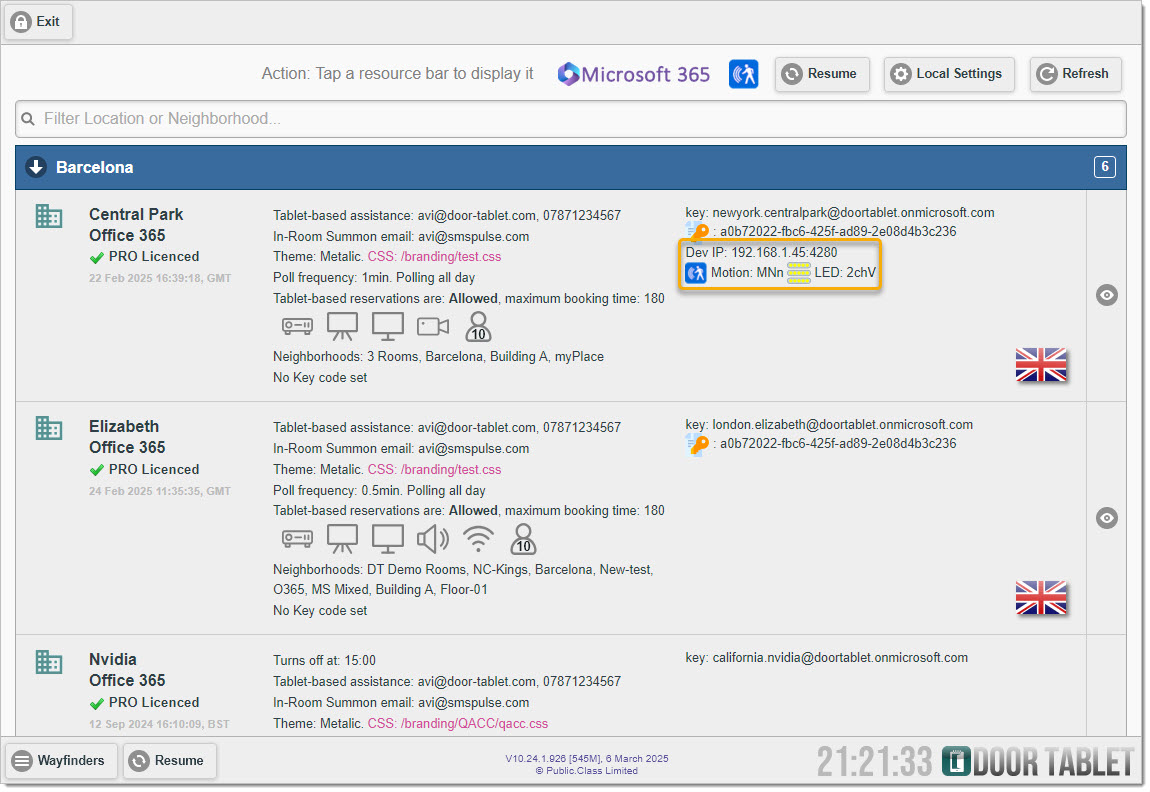 Finally, click on 'Local Settings' to make the final configuration of the LEDs...
 Notes:
- When you open a room, the IP address and the UID set in the device hub will become available to the Local Settings, and you will not need to retype these.
- It is recommended that you set the data in line with the steps above before you test the LED colors for the first time.
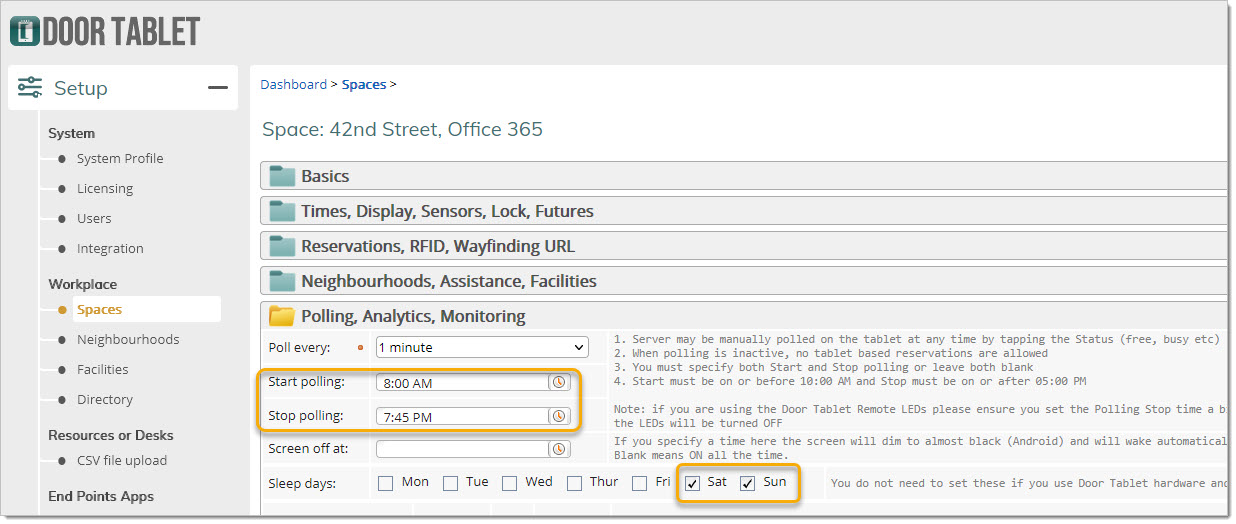
Turning the LEDs off for the night or the weekend
Some Door Tablet devices can be set to sleep for the night and the whole weekend. To ensure the LEDs are off to, you must set the Polling Stop time to be just before the device off time. For example, if you set the devices to sleep at 08:00 PM, you must set the Polling stop time to 07:45 PM. For example: