Click on images to see them in full screen
35D932205B6E783D80258E93004B96E7CalDAV
| Connecting Door Tablet to CalDAV | |
From version 10.8 of the Door Tablet Server, connect Door Tablet to a CalDAV server to discover room calendars, display their schedules and create bookings from tablets. The CalDAV account must have access to each calendar you want to use.
Before you begin
- Obtain the CalDAV server or discovery URL, username and password. Use an app password if your provider requires one.
- Give the account read access to room calendars. Creating, changing and cancelling bookings also requires write access.
- Check that the Door Tablet server can reach the CalDAV endpoint, including any required VPN, firewall or network route.
- For HTTPS, use a certificate trusted by the Door Tablet server's Java environment.
Choose the CalDAV URL
There is no single URL for all CalDAV platforms. Obtain your provider's CalDAV server or discovery URL from its documentation or your calendar administrator. Include the required scheme, hostname, port (if specified) and path. Use HTTPS where available.
A common discovery address has the form https://calendar.example.com/.well-known/caldav. Some platforms require a different, product-specific path. This is an illustrative address: replace it with the actual URL supplied for your installation rather than assuming the discovery path is available.
The URL must be reachable from the Door Tablet server, including through any required VPN or firewall. A successful connection from an administrator's browser alone does not establish server connectivity.
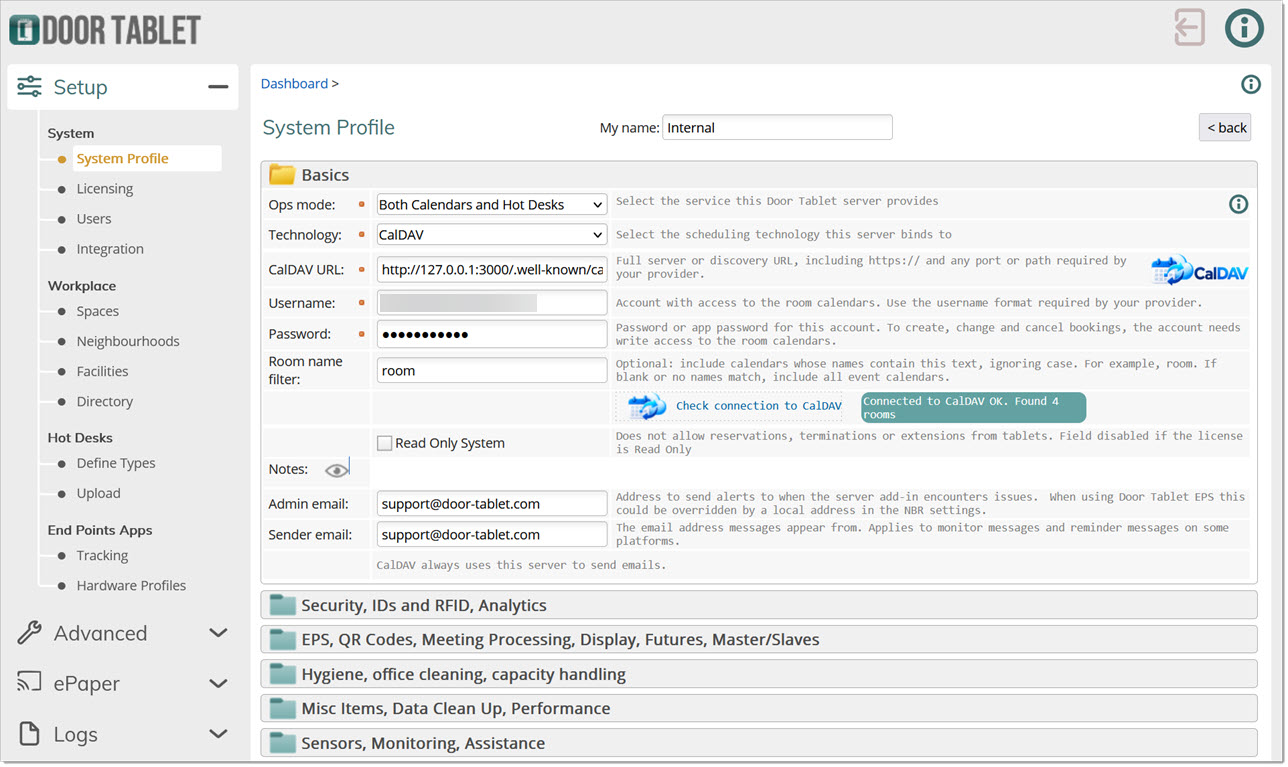
Local test address: http://127.0.0.1:3000/.well-known/caldav belongs to the local test setup. The address 127.0.0.1 points back to the computer making the request, and 3000 is the service port. When Door Tablet uses this address, it contacts its own server. For another installation, enter that installation's provider URL.
Configure the connection
- Open Setup → System Profile and select CalDAV as the scheduling technology.
- Enter the CalDAV URL, including the scheme, port and path required by your provider.
- Enter the account's Username and Password.
- Optionally enter a Room name filter. This matches text within calendar names without regard to case.
- Select Check connection to CalDAV. A successful check reports the calendars found.
- Save the System Profile before synchronising rooms. The connection check uses the entered values; room synchronisation uses the saved settings.
Filter behaviour: a blank filter includes all visible event calendars. If the filter matches no names, Door Tablet also includes all visible event calendars. The filter is a discovery convenience, not an access restriction.
Synchronise and configure rooms
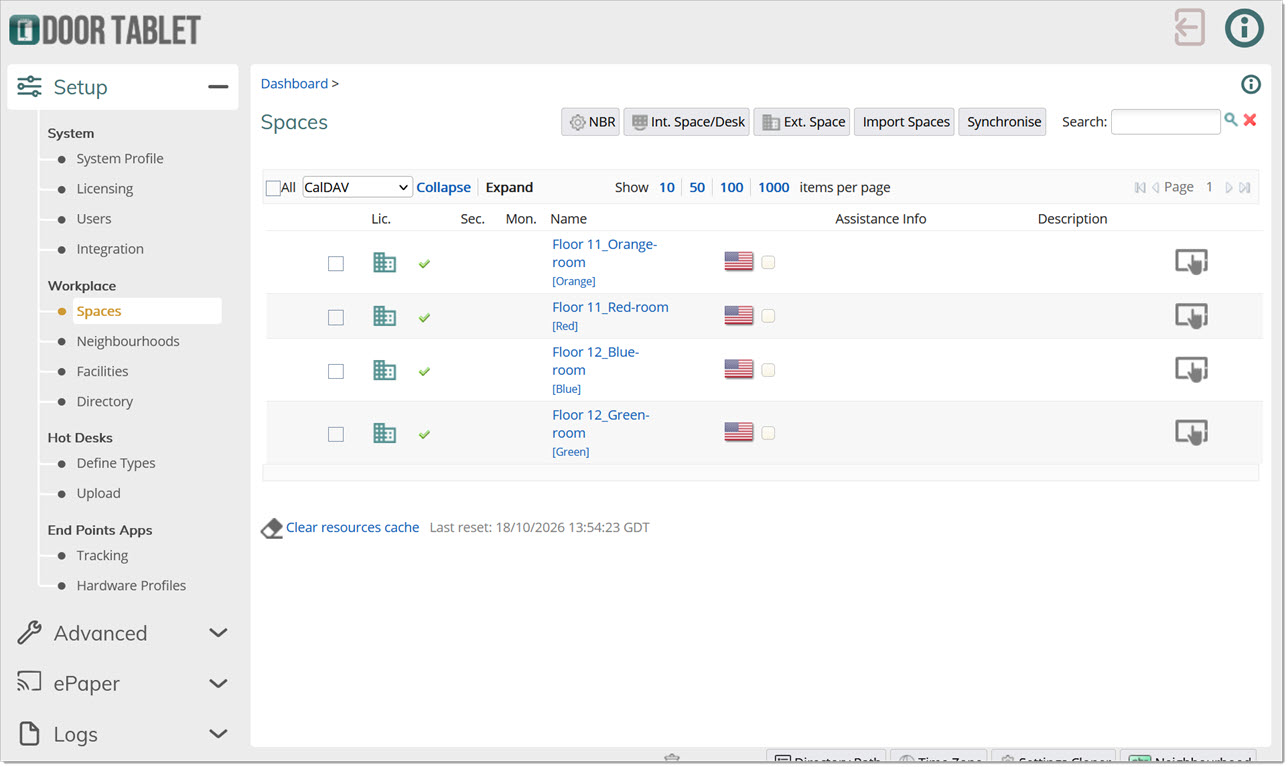
- Run room synchronisation from the room-management page.
- Review the processed, inserted and updated counts.
- Find newly discovered rooms under Newly created. New rooms start inactive.
- Review each room's name, location, neighbourhood and booking settings, then activate it for use.
- Check a tablet schedule against the source calendar.
Door Tablet uses the calendar URL as its stable room identifier. Synchronising again updates existing rooms rather than creating another room for the same URL. Existing administrator settings and activation choices are retained. Generated names may be cleaned up and given a numeric suffix to avoid duplicates.
Bookings and schedule updates
The integration reads calendar events and supports creating bookings and changing or cancelling supported individual events. A successful booking is read back from the provider to verify it. The provider must support the CalDAV operations used by Door Tablet and supply expanded recurrence instances when schedules contain recurring events.
All-day events and recurring instances are treated as read-only by Door Tablet. Manage those events in the source calendar. Do not assume every event visible on a tablet can be edited there.
CalDAV booking email is sent through the local Door Tablet server. Configure and test that server's mail delivery; the integration does not use CalDAV as a mail transport.
Identify the booker
To identify users on the tablet, configure the existing PIN or RFID facilities and the corresponding user records. Confirm that the resolved user has the correct name and email address. Identity is required for the separate Teams integration described in Microsoft Teams for Prism and CalDAV.
Optional Microsoft Teams meetings
The separate Microsoft Teams option can add a meeting link to eligible tablet bookings after the CalDAV room booking is confirmed. The booker must authenticate using PIN or RFID and have an email address on their user record. See Microsoft Teams for Prism and CalDAV for Microsoft setup, mail delivery and the current development limitations.
Draft — Teams feature under development. Creation and tablet extension hooks are implemented. Live booking validation has been completed. CalDAV termination/cancellation propagation and changes made directly in the source calendar are not yet reconciled to Teams. If Teams creation or an update fails, the confirmed room booking or extension remains valid: inspect the result and do not repeat the room operation to retry Teams.
Verify the setup
- Confirm connection and room synchronisation succeed.
- Create a short test booking on a writable room calendar and check its subject and times in both systems.
- Change or cancel the test booking through the supported tablet controls and verify the result in the source calendar.
- If using PIN or RFID, confirm the booking records the expected user.
- Confirm booking email delivery if enabled for your workflow.
Troubleshooting
- Connection failed or timed out: check the endpoint, port, VPN, DNS and routing from the Door Tablet server. A working browser connection on another machine does not establish server connectivity.
- TLS failure: check certificate validity, hostname and Java trust configuration.
- HTTP 401 or 403: check credentials and calendar permissions.
- Unexpected calendars: check account visibility and remember that an unmatched name filter returns all calendars.
- Room changes are missing: save System Profile, synchronise again and refresh the room page.
- Event cannot be changed: check write permission and whether the event is all-day or recurring.
- Meeting change was not confirmed: refresh the schedule and check the source calendar before retrying, to avoid repeating a change that may already have succeeded.